RMU build Gen-1.5: II. Teleport - C. Share RMU Services Via Teleport
From Internet Computer Wiki
This page is part of the Gen-1.5 RMU build runbook.
Go back to the previous section: B. Install Teleport Software
Ref: https://www.youtube.com/watch?v=cvW4b96aPL0
You can use proxmox to open separate shell windows to make copying/pasting between them easier.
On the teleport server:
- Create a short lived token to “invite” the Proxmox application. Be sure to edit the
<dc>portion in the following commandsudo tctl tokens add --type=app,node --app-name=<dc>-proxmox-webui --app-uri=https://localhost:8006- Take note of the
tokenandca_pinvalues
On the rmu server:
- Install pre-req packages:
apt update -y && apt upgrade -y && apt install sudo -y
- Install the teleport agent:
- Ensure you run the following command with the version of teleport you installed
sudo curl https://goteleport.com/static/install.sh | bash -s <Teleport Version>
- create the teleport application config:
- Ensure that the
proxyis pointed to your teleport domain name in the following command - Ensure that
—-app-namehas the correct data center code (dc) code in the following command (IE tp1, bu1, dl1, etc) sudo teleport configure --output=file --proxy=teleport.<domain name>:443 --token=/var/lib/teleport/token --roles=app,node --app-name=<dc>-proxmox-webui --app-uri=https://localhost:8006
- Ensure that the
- Save the token generated on the Teleport server:
sudo vi /var/lib/teleport/token
- Save the ca_pin generated on the Teleport server:
sudo vi /var/lib/teleport/ca_pin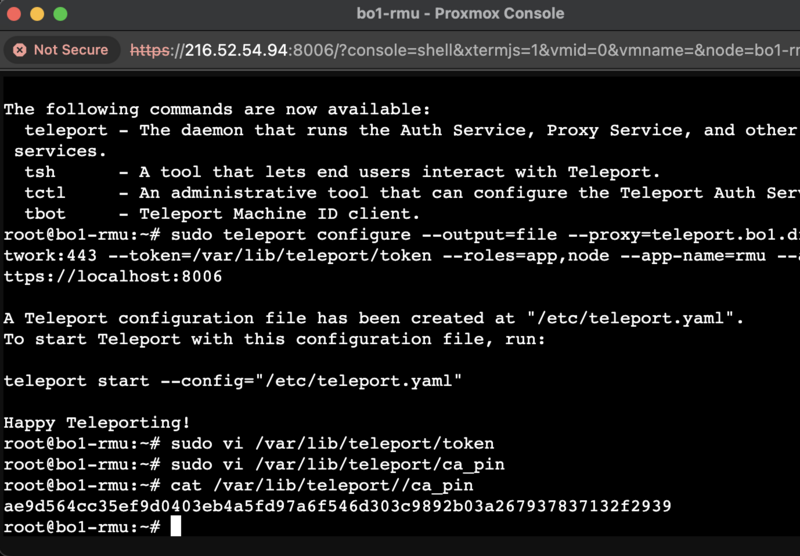
- Edit the
/etc/teleport.yamlto update theca_pinresource:sudo vi /etc/teleport.yaml- Update the
ca_pinresource with the path to theca_pinfile/var/lib/teleport/ca_pin - Under
ssh_service:in the same indentation ofenabled: “yes”add the following- Note: change <dc> to your site’s DC code (IE tp1, sh1, bu1, dl1 etc.)
jsx
              labels:
                dc: "<dc>"
                login: "root"
- Note: change <dc> to your site’s DC code (IE tp1, sh1, bu1, dl1 etc.)
- Remove
commands:sectionyaml commands: - name: hostname command: [hostname] period: 1m0s - Under name:
<dc>-proxmox-webui, in the same indentation ofinsecure_skip_verify:, change the value ofinsecure_skip_verify:totrueand add the following:- Note: change <dc> to your site’s DC code (IE tp1, sh1, bu1, dl1 etc.)
jsx
                  labels:
                    dc: "<dc>"
- Note: change <dc> to your site’s DC code (IE tp1, sh1, bu1, dl1 etc.)
- Sample
/etc/teleport.yamlfile:version: v3 teleport: nodename: rmu data_dir: /var/lib/teleport join_params: token_name: /var/lib/teleport/token method: token proxy_server: teleport.<dc>.<domain.name>:443 log: output: stderr severity: INFO format: output: text ca_pin: /var/lib/teleport/ca_pin diag_addr: "" auth_service: enabled: "no" ssh_service: enabled: "yes" labels: dc: "<dc>" login: "root" proxy_service: enabled: "no" https_keypairs: [] https_keypairs_reload_interval: 0s acme: {} app_service: enabled: "yes" debug_app: false apps: - name: <dc>-proxmox-webui uri: https://localhost:8006 public_addr: "" insecure_skip_verify: true labels: dc: "<dc>"
- Add teleport to
/etc/hostssudo vi /etc/hosts- add an entry of
10.10.100.22 teleport.<domain>- Note: what you made in the domain section of prerequisites.
 \
\
- Save and quit the file
- Start the teleport agent:
sudo systemctl enable teleportsudo systemctl start teleport


Continue to next section: D. Teleport Notes
Go to the index of the Gen-1.5 RMU build runbook.