Node Deployment Guide (with an HSM)
This runbook covers all steps necessary to install the Internet Computer Operating System (IC-OS) using the legacy NitroKey HSM instructions. To use the non-HSM onboarding instructions, follow the IC-OS Installation Runbook.
The physical machine is expected to be racked and stacked according to its respective manual.
To complete these steps, you are expected to be physically present in the data center your machine(s) reside(s). Once you successfully onboarded your first node, you can bring up the other nodes in parallel.
If you encounter issues during any of these steps, consult the Troubleshooting Node Deployment Errors page.
⚠️ DFINITY does not offer live support for Node Providers attempting to deploy nodes.
🚨 IMPORTANT: The IC-OS installer will completely wipe the disk. Back up any critical data before continuing.
1. Choose onboarding path (HSM vs no HSM)
If you chose the HSM Node Provider Onboarding Path, continue to the next step.
If you chose to onboard without a Nitrokey HSM, follow the IC-OS Installation Runbook to onboard your nodes.
2. Obtain requirements
- A USB (3.0 speed that can hold at least 4GB) to put the image file on.
- Faster USBs will allow the process to go much faster.
- The NitroKey HSM for your data center.
- [Optional] A USB hub
- This is helpful at some data centers for simultaneously connecting keyboard, mouse, Nitrokey, etc.
- It is recommended that each server has a label with the BMC's MAC address for ease of identification in future dashboard upgrades.
3. Download installation image
Download the latest release of the IC-OS USB Installer Image from the Internet Computer Dashboard Releases. Take a note of the version of the release.
- Note that you should always use a release from the last 6 weeks (newer is better) in order to ensure that your node can correctly connect to the network.
4. Verify checksum
Verify the IC-OS USB Installer Image downloaded in the previous step using the version of the release (commit hash) from the previous step.
macOS / Linux
- Run the reproducibility check and locally compute the checksum of the downloaded release. Open the Terminal and type:
RELEASE_VERSION=<SET IT>
curl -fsSL https://raw.githubusercontent.com/dfinity/ic/${RELEASE_VERSION}/ci/scripts/repro-check | python3 - -c ${RELEASE_VERSION} --setupos
- ⚠️ The reproducibility check takes around 20 minutes to run (depending on your hardware). At the end, it displays the locally computed checksum and the remote one.
- Then, open the Terminal and type to obtain the checksum of the downloaded file:
shasum -a 256 ~/Downloads/disk-img.tar.zst
- Compare the locally computed checksum with the checksum of the downloaded file.
- 🚨 Only continue if they are identical, otherwise please post your issue in the Node Provider Matrix channel.
Windows
- Run the reproducibility check and locally compute the checksum of the downloaded release. Open Powershell and type:
RELEASE_VERSION=<SET IT>
$RELEASE_VERSION = "<SET IT>"
Invoke-WebRequest -Uri "https://raw.githubusercontent.com/dfinity/ic/$RELEASE_VERSION/ci/scripts/repro-check" -UseBasicParsing | ForEach-Object {
    python3 - -c $RELEASE_VERSION --setupos
}
- ⚠️ The reproducibility check takes around 20 minutes to run (depending on your hardware). At the end, it displays the locally computed checksum and the remote one.
- Then, open Powershell and type to obtain the checksum of the downloaded file:
Get-FileHash -Algorithm SHA256 .\Downloads\disk-img.tar.zst
- Compare the locally computed checksum with the checksum of the downloaded file.
- 🚨 Only continue if they are identical, otherwise please post your issue in the Node Provider Matrix channel.
5. Unarchive file
Mac OS X
- Open the Terminal and type:
tar xzvf ~/Downloads/disk-img.tar.zst
Linux / Ubuntu
- Open the Terminal and type:
tar xzvf ~/Downloads/disk-img.tar.zst
Windows
- Open PowerShell and type:
tar xzvf .\Downloads\disk-img.tar.zst
6. Create Bootable USB Stick
Mac OS X
- Open the Terminal and type:
diskutil list
- All available drives should be shown. Identify which device corresponds to your USB stick. You may need to unmount the USB drive:
sudo diskutil unmount /dev/YOUR_USB_DEVICE_MOUNTED_PARTITION # E.g. /dev/disk4s1
- Replace /dev/YOUR_USB_DEVICE with the device that corresponds to your USB stick. Additionally, replace the path to your downloaded IC-OS disk.img file. Warning: You risk losing your own data if you specify a wrong drive.
- If you get a “device is busy” error from the dd command, you can try running the following command to unmount all of the partitions on the disk, then re-run the dd command:
sudo dd if=/Users/YOUR_USER_NAME/Downloads/disk.img of=/dev/YOUR_USB_DEVICE bs=1M status=progress
sudo diskutil unmountDisk /dev/YOUR_USB_DEVICE # E.g. /dev/disk4
Linux / Ubuntu
- Open the Terminal and type
blkid
- All available drives should be shown. Identify which device corresponds to your USB stick. You may need to unmount the USB drive:
sudo umount /dev/YOUR_USB_DEVICE_MOUNTED_PARTITION # E.g. /dev/sdb1
- Replace /dev/YOUR_USB_DEVICE with the device that corresponds to your USB stick. Additionally, replace the path to your downloaded IC-OS disk.img file. Warning: You risk losing your own data if you specify a wrong drive.
sudo dd if=/home/YOUR_USER_NAME/Downloads/disk.img of=/dev/YOUR_USB_DEVICE bs=1M status=progress
Windows
- Download and install Rufus Portable
- Start Rufus
- Select the USB stick under device and select the previously downloaded IC-OS disk image and press start
- You may see some warnings. Make sure you don't have any other USBs in your computer and chose OK
- The "Ready" bar will go from left to right as it completes.


7. Add configuration
A. Open Config.ini in a text editor
Mac OS X
- Open Finder. You should now be able to see the CONFIG partition. If it's not visible, remove the USB and insert it again.
- Double-click
config.inito open it in TextEdit.

Linux
- Open the File Manager. You should now be able to see the CONFIG partition. If it's not visible, remove the USB and insert it again.
- Double-click
config.inito open it in KWrite.

Windows
- Open the Disk Management utility with a right click on the Start menu.
 #:
#:
- Right click the CONFIG partition.
- Select Change drive letter or paths...
- Select any letter from the drop-down list.
- Click OK.
- You should now be able to see the CONFIG partition in your Windows Explorer. Select the
config.iniconfiguration file. - Click on Edit to open it.


B. Edit Config.ini
Edit the config.ini file to add your network configuration.
Note that all Node Providers are requested to deploy two nodes with IPv4 and a domain name for every data center they operate in. Node Providers should deploy IPv4 to the first two nodes in their first rack.
- Set the appropriate value for the node_reward_type.

- You can find the value to set by following Node Deployment config.ini
- Insert your IPv6 prefix and gateway.

- The IPv6 prefix should consist of four groups of hexadecimal digits, separated by colons (':'). Each group can contain up to four hex digits.
- For example, a valid prefix could look like this:
2a00:fb01:400:200 - Important:
- The prefix should not have a trailing ':'
- IPv6 CIDR notation allows for a double colon ('::') to represent consecutive groups of zeroes in an address. However, the prefix configuration in this context does not support '::'. The '::' shorthand should not be used. Even if some groups are all zeros, they must be explicitly written out.
- [Optional] Insert your IPv4 info and domain name.

- Configuring your node with IPv4 settings is optional, but if you do configure your node with IPv4 settings, you must also define the domain name for your node.
- Important:
- Please note that you must use a unique IPv4 address for each node you deploy. This means that you cannot use a single IC-OS installation image to deploy multiple nodes (like you are able to do when just configuring IPv6 nodes). After each IPv4 node deployment, you must plug your IC-OS Installation USB stick back into your laptop and return to step 6 in the node deployment guide to reconfigure your installation image.
- You can add, remove, or update your node’s IPv4 address and domain name after completing node deployment using dfx commands. See here for details.
- [Optional] Enable Trusted Execution Environment
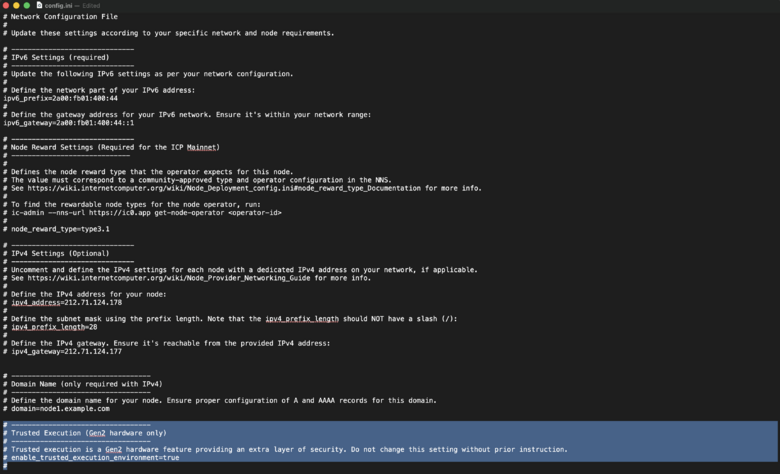
- Only if given explicit direction to do so, uncomment
enable_trusted_execution_environment=trueto enable Trusted Execution Environment. This feature should only be enabled on Gen 2 node hardware.
- Only if given explicit direction to do so, uncomment
- Save the changes.
- If you have trouble saving this file directly, you may need to save to a known location first, then copy the file into place.
- If you have trouble saving this file directly, you may need to save to a known location first, then copy the file into place.


8. Connect Crash Cart
- In order to configure the UEFI and initiate the installation of the IC-OS, please connect a crash cart to the physical machine.
- Plug-in the VGA/Video, keyboard and IC-OS USB stick

9. UEFI Setup and Boot Menu
Use the related page below to set up the BIOS/UEFI according to your hardware vendor.
Important: Do NOT enable the RAID bios setting. Doing so will cause issues with the IC-OS installation.
Resume from this point when you are finished configuring the BIOS.
10. IC-OS Installation
- Please wait while the USB Installer is booting up. This process can take up to 3 minutes.
- The IC-OS installation starts. Please keep an eye on the progress. This part can take up to 10 minutes. Please remember to check the Troubleshooting Node Deployment Errors page if you encounter any errors.
- Once you get asked to insert the HSM, please remove the keyboard and instead insert the HSM USB device.
- If the installation finished successfully, it will initiate a reboot. 🚨 Please do not unplug the USB stick or HSM USB device at this point. 🚨


11. First Boot
Please remember to check the Troubleshooting Node Deployment Errors page if you encounter any errors.
- After the IC-OS installation is complete, the machine reboots. Then, please IGNORE the grub menu. You do NOT need to input anything. This menu will go away after a 15-second timeout:
- The node will then boot-up, and then, after a few minutes, you should see the following log:

- This log does NOT yet signify a successful onboarding. Please wait at least 10 minutes for a
Join request successful!log signifying a successful onboarding. - If after 10 minutes, you don't see anything else logged to the screen, please leave your node running and post a message in the Matrix channel with a screenshot of you console and the additional Support request information requirements
- Once you see the
Join request successful!message, you may unplug the HSM USB device, USB stick and VGA/Video.


Congratulations! Your machine successfully joined the Internet Computer! The machine has joined the IC and the Node Provider will start receiving rewards!
Note that if you do NOT see a "Join request successful" message, your node may still have successfully onboarded. Continue to the next step to attempt to verify node onboarding.
12. Verify node onboarding
- Obtain your Node ID
- Your Node ID should have been outputted in the previous step. If it wasn't, please wait at least 10 minutes to see if the node ID is logged to the console.
- Verify that your node was successfully onboarded by checking its status on the dashboard
- The dashboard can be searched by your Node Provider principal. There, you should see the Node ID of your node.
- If the status of your node is either “Awaiting Subnet” or “Active in Subnet,” congratulations! Your machine successfully joined the Internet Computer!
- If the status of your node is NOT either “Awaiting Subnet” or “Active in Subnet”, or if it is NOT listed under your Node Provider principal, you should consult the Troubleshooting Node Deployment Errors page.
- If deploying with IPv4, verify that IPv4 was successfully configured
- Ten minutes after the initial
Join request successful!message, you should see another log indicating a successful IPv4 deployment: - If your log says
IPv4: none configured, then your IPv4 deployment failed.
- Ten minutes after the initial


If you are failing to verify your node onboarding, consult the Troubleshooting Node Deployment Errors page.