Difference between revisions of "Retrieving a Dell TSR Log"
From Internet Computer Wiki
Katie.peters (talk | contribs) (Adding more directions) |
Katie.peters (talk | contribs) (Adding more directions) |
||
| Line 8: | Line 8: | ||
* If the faulty server is not allowing access to the iDRAC, then the Lifecycle Controller can be used to pull a TSR log and export it to a USB using [https://www.dell.com/support/kbdoc/en-us/000130772/export-support-assist-collection-and-raid-controller-log-through-poweredge-lifecycle-controller these directions] from Dell. | * If the faulty server is not allowing access to the iDRAC, then the Lifecycle Controller can be used to pull a TSR log and export it to a USB using [https://www.dell.com/support/kbdoc/en-us/000130772/export-support-assist-collection-and-raid-controller-log-through-poweredge-lifecycle-controller these directions] from Dell. | ||
** Note that if this is the first time the lifecycle controller has been launched, you will be greeted with a 5-step setup wizard. One of the steps includes network configuration. For this, everything must be left back, but they are forced to choose a NIC interface in a dropdown menu. In that dropdown menu, please have them select a NIC interface that is empty. | ** Note that if this is the first time the lifecycle controller has been launched, you will be greeted with a 5-step setup wizard. One of the steps includes network configuration. For this, everything must be left back, but they are forced to choose a NIC interface in a dropdown menu. In that dropdown menu, please have them select a NIC interface that is empty. | ||
| + | * Use Dell's directions to access the network settings of the iDRAC through the BIOS using a crash cart: | ||
| + | ** https://www.dell.com/support/kbdoc/en-us/000177212/dell-poweredge-how-to-configure-the-idrac9-and-the-lifecycle-controller-network-ip | ||
| + | ** The settings you would be looking to change are the IPv4 settings. | ||
| + | ** After you have set the IP of the iDRAC, you can connect your laptop directly to the iDRAC port. | ||
| + | ** Once connected you can go into your laptop network settings and change your IP to something that is within the same network space of the iDRAC. | ||
| + | ** Once complete, you should be able to open a browser and go to the IP that you set the iDRAC. | ||
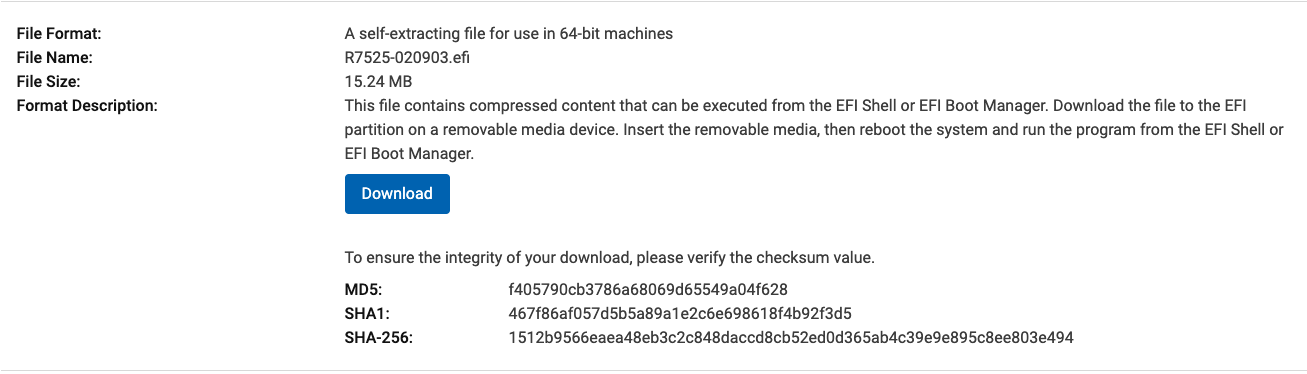
* Here is how you can use a USB to perform a firmware update. For the following method to work please download the .efi file, a screenshot of the correct one to download is [https://mywikis-wiki-media.s3.us-central-1.wasabisys.com/internetcomputer/Screenshot-efi.png here]. | * Here is how you can use a USB to perform a firmware update. For the following method to work please download the .efi file, a screenshot of the correct one to download is [https://mywikis-wiki-media.s3.us-central-1.wasabisys.com/internetcomputer/Screenshot-efi.png here]. | ||
*# Copy the file to a USB device | *# Copy the file to a USB device | ||
Revision as of 19:37, 24 February 2023
When Dell is called to service a server, they will ask for the service tag. This is the serial number for the server which is listed on the pull-out tag of the server.
They will also frequently ask for a TSR log. Here are several sets of directions that may be needed, depending on the situation:
- Export a SupportAssist collection via iDRAC9
- Changing the Integrated Dell Remote Access Controller 9 (iDRAC9) default login password
- This information from Dell may also be helpful if you need to reset it with KVM connected.
- If the faulty server is not allowing access to the iDRAC, then the Lifecycle Controller can be used to pull a TSR log and export it to a USB using these directions from Dell.
- Note that if this is the first time the lifecycle controller has been launched, you will be greeted with a 5-step setup wizard. One of the steps includes network configuration. For this, everything must be left back, but they are forced to choose a NIC interface in a dropdown menu. In that dropdown menu, please have them select a NIC interface that is empty.
- Use Dell's directions to access the network settings of the iDRAC through the BIOS using a crash cart:
- https://www.dell.com/support/kbdoc/en-us/000177212/dell-poweredge-how-to-configure-the-idrac9-and-the-lifecycle-controller-network-ip
- The settings you would be looking to change are the IPv4 settings.
- After you have set the IP of the iDRAC, you can connect your laptop directly to the iDRAC port.
- Once connected you can go into your laptop network settings and change your IP to something that is within the same network space of the iDRAC.
- Once complete, you should be able to open a browser and go to the IP that you set the iDRAC.
- Here is how you can use a USB to perform a firmware update. For the following method to work please download the .efi file, a screenshot of the correct one to download is here.
- Copy the file to a USB device
- Plug in the USB device and press F11 during POST to enter BIOS Boot Manager
- Navigate to the System Utilities menu and select BIOS Update File Explorer
- Select the USB device and navigate through the directory contents to find the executable (.efi)
- Launch the executable and follow the instructions provided by the flash utility.