Difference between revisions of "RMU build Gen-1.5: IV. Best Practices - C. Dell OpenManage Enterprise"
From Internet Computer Wiki
Katie.peters (talk | contribs) |
Katie.peters (talk | contribs) |
||
| Line 5: | Line 5: | ||
This is a service that allows you to talk to the Baseboard Management Controller(s) (BMC) of your IC nodes. This service will allow you to discover your Dell’s servers iDRACs (Dell’s version of a BMC.) Once configured, you will be able to apply firmware updates remotely. | This is a service that allows you to talk to the Baseboard Management Controller(s) (BMC) of your IC nodes. This service will allow you to discover your Dell’s servers iDRACs (Dell’s version of a BMC.) Once configured, you will be able to apply firmware updates remotely. | ||
| − | + | ==Create VM== | |
| − | # From the main Proxmox page, select <code>Create VM</code> to launch the <code>Create: Virtual Machine</code> dialog window. | + | #From the main Proxmox page, select <code>Create VM</code> to launch the <code>Create: Virtual Machine</code> dialog window. |
| − | # Tick the <code>Advanced</code> box and the <code>Start at boot:</code> box, then enter VM ID of <code>123</code>, set Name: to <code><dc>-ome</code>. Enter 10 into the <code>Start/Shutdown Order:</code>. Select <code>Next</code>. | + | #Tick the <code>Advanced</code> box and the <code>Start at boot:</code> box, then enter VM ID of <code>123</code>, set Name: to <code><dc>-ome</code>. Enter 10 into the <code>Start/Shutdown Order:</code>. Select <code>Next</code>. |
#*[[File:OME - VM Create - 01 - General.png|800px]] | #*[[File:OME - VM Create - 01 - General.png|800px]] | ||
| − | # Select <code>Do not use any media</code>. Set Type: to <code>Other</code>. Select <code>Next</code>. | + | #Select <code>Do not use any media</code>. Set Type: to <code>Other</code>. Select <code>Next</code>. |
#*[[File:OME - VM Create - 02 - OS.png|800px]] | #*[[File:OME - VM Create - 02 - OS.png|800px]] | ||
| − | # Ensure that Graphic card: is set to <code>Default</code>, SCSI Controller: is set to <code>VirtIO SCSI single</code>, Machine: is set to <code>Default (i440fx)</code>, BIOS: is set to <code>Default (SeaBIOS)</code>. Select <code>Next</code>. | + | #Ensure that Graphic card: is set to <code>Default</code>, SCSI Controller: is set to <code>VirtIO SCSI single</code>, Machine: is set to <code>Default (i440fx)</code>, BIOS: is set to <code>Default (SeaBIOS)</code>. Select <code>Next</code>. |
#*[[File:OME - VM Create - 03 - System.png|800px]] | #*[[File:OME - VM Create - 03 - System.png|800px]] | ||
| − | # Ensure that Bus/Device: is set to <code>IDE</code> & <code>0</code>, Storage: is set to <code>local-zfs,</code> Disk size (GiB): is set to <code>8</code>, <code>Backup:</code> box is ticked, Async IO: is set to <code>Default (io_uring)</code>. Select <code>Next</code>. | + | #Ensure that Bus/Device: is set to <code>IDE</code> & <code>0</code>, Storage: is set to <code>local-zfs,</code> Disk size (GiB): is set to <code>8</code>, <code>Backup:</code> box is ticked, Async IO: is set to <code>Default (io_uring)</code>. Select <code>Next</code>. |
#*[[File:Screenshot 2024-01-22 at 2.50.42 PM.png|800px]] | #*[[File:Screenshot 2024-01-22 at 2.50.42 PM.png|800px]] | ||
| − | # Set Sockets to <code>1</code>, set Type: to <code>X86-64-v2-AES</code>, set Cores: to <code>8</code>. Select <code>Next</code>. | + | #Set Sockets to <code>1</code>, set Type: to <code>X86-64-v2-AES</code>, set Cores: to <code>8</code>. Select <code>Next</code>. |
#*[[File:OME - VM Create - 05 - CPU.png|800px]] | #*[[File:OME - VM Create - 05 - CPU.png|800px]] | ||
| − | # Set Memory(MiB): to <code>16767</code> and Minimum memory (MB): to <code>2048</code>. Select <code>Next</code>. | + | #Set Memory(MiB): to <code>16767</code> and Minimum memory (MB): to <code>2048</code>. Select <code>Next</code>. |
#*[[File:OME - VM Create - 06 - Memory.png|800px]] | #*[[File:OME - VM Create - 06 - Memory.png|800px]] | ||
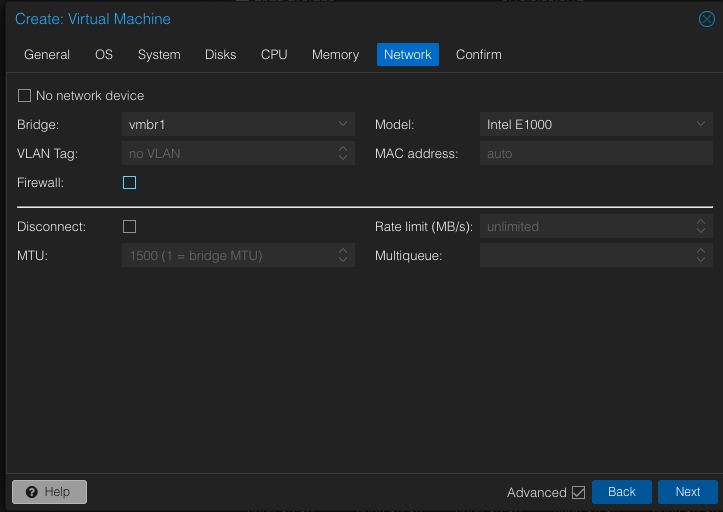
| − | # Set Bridge: to <code>vmbr1</code>, set Mode: to <code>Intel E1000</code>, Disable the <code>Firewall:</code> tickbox. Select <code>Next</code>. | + | #Set Bridge: to <code>vmbr1</code>, set Mode: to <code>Intel E1000</code>, Disable the <code>Firewall:</code> tickbox. Select <code>Next</code>. |
#*[[File:OME - VM Create - 07 - Network.png|800px|link=Special:FilePath/OME_-_VM_Create_-_07_-_Network.png]] | #*[[File:OME - VM Create - 07 - Network.png|800px|link=Special:FilePath/OME_-_VM_Create_-_07_-_Network.png]] | ||
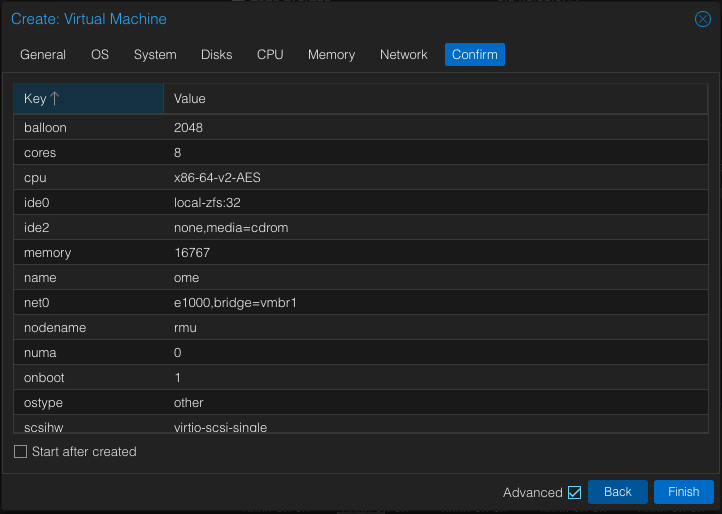
| − | # Do NOT tick the <code>Start after created</code> because we need to map the (soon to be downloaded) OME image to a disk. Select <code>Finish</code>. | + | #Do NOT tick the <code>Start after created</code> because we need to map the (soon to be downloaded) OME image to a disk. Select <code>Finish</code>. |
#*[[File:OME - VM Create - 08 - Confirm.png|800px|link=Special:FilePath/OME_-_VM_Create_-_08_-_Confirm.png]] | #*[[File:OME - VM Create - 08 - Confirm.png|800px|link=Special:FilePath/OME_-_VM_Create_-_08_-_Confirm.png]] | ||
| − | + | ==Download & Import OME== | |
| − | # On the RMU, download OME virtual image | + | #On the RMU, download OME virtual image |
| − | # Open a shell console on the RMU<syntaxhighlight lang="yaml"> | + | #Open a shell console on the RMU<syntaxhighlight lang="yaml"> |
wget --user-agent="Mozilla" -O ome.zip 'https://dl.dell.com/FOLDER07474001M/1/openmanage_enterprise_kvm_format_3.6.1.zip?uid=c802e350-6536-4f28-7a66-93b4f844cd30&fn=openmanage_enterprise_kvm_format_3.6.1.zip' | wget --user-agent="Mozilla" -O ome.zip 'https://dl.dell.com/FOLDER07474001M/1/openmanage_enterprise_kvm_format_3.6.1.zip?uid=c802e350-6536-4f28-7a66-93b4f844cd30&fn=openmanage_enterprise_kvm_format_3.6.1.zip' | ||
</syntaxhighlight> | </syntaxhighlight> | ||
| − | # Unzip the downloaded file<syntaxhighlight lang="yaml"> | + | #Unzip the downloaded file<syntaxhighlight lang="yaml"> |
apt update && apt install unzip -y | apt update && apt install unzip -y | ||
unzip ome.zip | unzip ome.zip | ||
</syntaxhighlight> | </syntaxhighlight> | ||
| − | # Import the QCOW2 image into the OEM VM’s space<syntaxhighlight lang="yaml"> | + | #Import the QCOW2 image into the OEM VM’s space<syntaxhighlight lang="yaml"> |
cd appliance/qemu-kvm/ | cd appliance/qemu-kvm/ | ||
qm importdisk 123 openmanage_enterprise.qcow2 local-zfs | qm importdisk 123 openmanage_enterprise.qcow2 local-zfs | ||
</syntaxhighlight> | </syntaxhighlight> | ||
| − | #* [[File:Screenshot 2023-12-19 at 1.31.39 PM.png|800px]] | + | #*[[File:Screenshot 2023-12-19 at 1.31.39 PM.png|800px]] |
| − | # Configure the imported disk as the boot disk for the VM | + | #Configure the imported disk as the boot disk for the VM |
| − | # Select the <code>OME</code> VM on the left side | + | #Select the <code>OME</code> VM on the left side |
| − | # Select <code>Hardware</code> | + | #Select <code>Hardware</code> |
| − | # Double click <code>Unused Disk</code> | + | #Double click <code>Unused Disk</code> |
| − | #* [[File:OME - VM Create - 09 - Add Unused Disk 01.png|800px]] | + | #*[[File:OME - VM Create - 09 - Add Unused Disk 01.png|800px]] |
| − | # Set Bus/Device: to <code>VirtIO Block</code>. Select <code>Add</code> | + | #Set Bus/Device: to <code>VirtIO Block</code>. Select <code>Add</code> |
| − | #* [[File:OME - VM Create - 10 - Add Unused Disk 02.png|800px]] | + | #*[[File:OME - VM Create - 10 - Add Unused Disk 02.png|800px]] |
| − | # Select <code>Options</code> and double Click <code>Boot Order</code> | + | #Select <code>Options</code> and double Click <code>Boot Order</code> |
| − | #* [[File:OME - VM Create - 11 - Update Boot Order 01.png|800px]] | + | #*[[File:OME - VM Create - 11 - Update Boot Order 01.png|800px]] |
| − | # Move the device with description <code>local-zfs:vm-123-disk-1…</code> to position 1. Tick the enable box next to it. | + | #Move the device with description <code>local-zfs:vm-123-disk-1…</code> to position 1. Tick the enable box next to it. |
| − | #* [[File:OME - VM Create - 12 - Update Boot Order 02.png|800px]] | + | #*[[File:OME - VM Create - 12 - Update Boot Order 02.png|800px]] |
| − | # Untick the enable box for all other boot devices Select <code>OK</code> | + | #Untick the enable box for all other boot devices Select <code>OK</code> |
| − | #* [[File:OME - VM Create - 13 - Update Boot Oder 03.png|800px]] | + | #*[[File:OME - VM Create - 13 - Update Boot Oder 03.png|800px]] |
| − | # When complete, your options screen should look like the following | + | #When complete, your options screen should look like the following |
| − | #* [[File:OME - VM Create - 14 - Start VM.png|800px]] | + | #*[[File:OME - VM Create - 14 - Start VM.png|800px]] |
| − | # Select the <code>OME</code> VM and start it. | + | #Select the <code>OME</code> VM and start it. |
| + | ==Configure OME == | ||
| + | |||
| + | #Select the <code>OME</code> VM and Select <code>Console</code> | ||
| + | #Wait for the VM to start, please be patient as this is it’s first boot. (You can use your <code>tab</code> key to scroll through the options available and hit <code>enter</code> to select) | ||
| + | #Select <code>Accept</code> | ||
| + | #*[[File:OME - VM Create - 15 - Accept EULA.png|800px]] | ||
| + | #Select your keyboard type | ||
| + | #*[[File:OME - VM Create - 16 - Select Keyboard.png]] | ||
| + | #Create a non trivial password and store it in your password manager. | ||
| + | #Once you enter in your password, hit tab to scroll over apply and then enter to select. | ||
| + | #*[[File:OME - VM Create - 17 - Set Default Password.png|800px]] | ||
| + | #Use your arrow keys to scroll down to <code>Set Networking Parameters</code> and hit enter | ||
| + | #*[[File:OME - VM Create - 18 - Configure OME Networking 01.png|800px]] | ||
| + | #Hit enter on the available Network adapter | ||
| + | #*[[File:OME - VM Create - 19 - Configure OME Networking 02.png|800px]] | ||
| + | #Enter in your new non trivial password you just made. | ||
| + | #Hit tab to scroll over Continue and hit enter | ||
| + | #*[[File:OME - VM Create - 20 - Configure OME Networking 03.png]] | ||
| + | #Set static IPv4 IP Address to <code>10.10.100.23</code> | ||
| + | #*You can use the arrow keys to get to DHCP and then hit tab to enter the editable text fields | ||
| + | #Set Static Gateway to <code>10.10.100.1</code> | ||
| + | #Set Static Subnet Mask to <code>255.255.255.0</code> | ||
| + | #Set Static Preferred DNS server to <code>1.1.1.1</code> | ||
| + | #Select Apply | ||
| + | #*[[File:Screenshot 2023-12-19 at 2.47.16 PM.png|800px]] | ||
| + | #Enter in your non trivial password and select <code>Continue</code> | ||
| + | #*[[File:Screenshot 2023-12-19 at 2.47.34 PM.png|800px]] | ||
| + | |||
| + | ==Share Services with Teleport== | ||
==Continue to next section: [[RMU build Gen-1.5: IV. Best Practices - D. Update Firmware on SuperMicro Nodes|D. Update Firmware on SuperMicro Nodes]]== | ==Continue to next section: [[RMU build Gen-1.5: IV. Best Practices - D. Update Firmware on SuperMicro Nodes|D. Update Firmware on SuperMicro Nodes]]== | ||
| − | == Or skip and jump to [[RMU build Gen-1.5: IV. Best Practices - E. Enable Remote Access to Servers Console|E. Enable Remote Access to Servers Console]] == | + | ==Or skip and jump to [[RMU build Gen-1.5: IV. Best Practices - E. Enable Remote Access to Servers Console|E. Enable Remote Access to Servers Console]]== |
Go to the index of the [[RMU build Gen-1.5|Gen-1.5 RMU build runbook]]. | Go to the index of the [[RMU build Gen-1.5|Gen-1.5 RMU build runbook]]. | ||
Revision as of 22:23, 28 February 2024
This page is part of the Gen-1.5 RMU build runbook.
Go back to the previous section: B. Install RACADM Tool on RMU
C. Dell OpenManage Enterprise (Recommended)
This is a service that allows you to talk to the Baseboard Management Controller(s) (BMC) of your IC nodes. This service will allow you to discover your Dell’s servers iDRACs (Dell’s version of a BMC.) Once configured, you will be able to apply firmware updates remotely.
Create VM
- From the main Proxmox page, select
Create VMto launch theCreate: Virtual Machinedialog window. - Tick the
Advancedbox and theStart at boot:box, then enter VM ID of123, set Name: to<dc>-ome. Enter 10 into theStart/Shutdown Order:. SelectNext. - Select
Do not use any media. Set Type: toOther. SelectNext. - Ensure that Graphic card: is set to
Default, SCSI Controller: is set toVirtIO SCSI single, Machine: is set toDefault (i440fx), BIOS: is set toDefault (SeaBIOS). SelectNext. - Ensure that Bus/Device: is set to
IDE&0, Storage: is set tolocal-zfs,Disk size (GiB): is set to8,Backup:box is ticked, Async IO: is set toDefault (io_uring). SelectNext. - Set Sockets to
1, set Type: toX86-64-v2-AES, set Cores: to8. SelectNext. - Set Memory(MiB): to
16767and Minimum memory (MB): to2048. SelectNext. - Set Bridge: to
vmbr1, set Mode: toIntel E1000, Disable theFirewall:tickbox. SelectNext. - Do NOT tick the
Start after createdbecause we need to map the (soon to be downloaded) OME image to a disk. SelectFinish.


Download & Import OME
- On the RMU, download OME virtual image
- Open a shell console on the RMU
wget --user-agent="Mozilla" -O ome.zip 'https://dl.dell.com/FOLDER07474001M/1/openmanage_enterprise_kvm_format_3.6.1.zip?uid=c802e350-6536-4f28-7a66-93b4f844cd30&fn=openmanage_enterprise_kvm_format_3.6.1.zip' - Unzip the downloaded file
apt update && apt install unzip -y
unzip ome.zip
- Import the QCOW2 image into the OEM VM’s space
cd appliance/qemu-kvm/
qm importdisk 123 openmanage_enterprise.qcow2 local-zfs
- Configure the imported disk as the boot disk for the VM
- Select the
OMEVM on the left side - Select
Hardware - Double click
Unused Disk - Set Bus/Device: to
VirtIO Block. SelectAdd - Select
Optionsand double ClickBoot Order - Move the device with description
local-zfs:vm-123-disk-1…to position 1. Tick the enable box next to it. - Untick the enable box for all other boot devices Select
OK - When complete, your options screen should look like the following
- Select the
OMEVM and start it.


Configure OME
- Select the
OMEVM and SelectConsole - Wait for the VM to start, please be patient as this is it’s first boot. (You can use your
tabkey to scroll through the options available and hitenterto select) - Select
Accept - Select your keyboard type
- Create a non trivial password and store it in your password manager.
- Once you enter in your password, hit tab to scroll over apply and then enter to select.
- Use your arrow keys to scroll down to
Set Networking Parametersand hit enter - Hit enter on the available Network adapter
- Enter in your new non trivial password you just made.
- Hit tab to scroll over Continue and hit enter
- Set static IPv4 IP Address to
10.10.100.23- You can use the arrow keys to get to DHCP and then hit tab to enter the editable text fields
- Set Static Gateway to
10.10.100.1 - Set Static Subnet Mask to
255.255.255.0 - Set Static Preferred DNS server to
1.1.1.1 - Select Apply
- Enter in your non trivial password and select
Continue


Continue to next section: D. Update Firmware on SuperMicro Nodes
Or skip and jump to E. Enable Remote Access to Servers Console
Go to the index of the Gen-1.5 RMU build runbook.